-
After releasing ColoredPrintf I started investigating color terminals, especially how some terminals can display more than the traditional 16 colors.
While on windows console colors are changed using a call to the
SetConsoleTextAttributeAPI, on unix XTerm and other terminals follow the way the VT100 physical terminal did it with special escape sequences that are sent to the terminal but change it’s behavior instead of being displayed.It is especially interesting as such terminals are becomming more present, even in the windows world. ConEmu support a lot even if it’s buggy, the venerable windows terminal can be told to interpret them and it’ll even soon gain True Color support too.
Compatibility
If you’re on windows, expect bugs everywhere but if you have a mac or a linux OS you’re good. In more details :
- On windows ConEmu is still the best you can do, it’s buggy but usable. There is a little trick to
enable more than 16 colors but it’s easy and need to be done only once per session, I’ll explain how to do it
from code in Appendix A but you can simply display one of the ConEmu sample file with
cmd /c type "%ConEmuBaseDir%\Addons\AnsiColors256.ans"and it’ll activate it. - On macOS (Tested on sierra) the integrated terminal can display 256 colors without problems but will translate any True Color command to 16 colors, giving a very ugly result. But iTerm2 is free works !
- On linux the Gnome default terminal, XTerm and Konsole works flawlessly (XTerm adapt true color codes to 256 colors but it’s algorithm is pretty good).
- Visual Studio Code integrated terminal can do most of them and as the REPL provided by the Ionide plugin uses it we can use the F# REPL directly there. But beware the windows version of the VSCode terminal is pretty buggy at the moment and often completely break when control codes are sent (Well, resizing it is enough to break it, you don’t need much 😁)
Using F# to play with escape sequences
Escape sequences are generated by printing the
ESC(0x1B)character followed by at least another character.The most common ones start with the “CSI” sequence
ESC[followed by parameters and ending with a character designating the command. The full list is on Wikipedia or MSDN.Let’s try that in F# :
let esc = string (char 0x1B)
System.Console.WriteLine(esc + "[31;1m" + "Hello world" + esc + "[0m")
It displayed
Hello Worldin bright red asmis the graphic command taking sub-commands separated by;,31is the red color and1signal that we want bold/bright text. And at the end0is the reset sub-command, without it the terminal would stay red on all following lines.Using
kprintfwe can create a printf-like function and start implementing a few of the escape sequences :let csi = esc + "[" let printsequencef f = Printf.kprintf (fun s -> System.Console.Write(esc + s)) f let printcsif f = Printf.kprintf (fun s -> System.Console.Write(csi + s)) f let selectGraphicRendition (gr: int list) = printcsif "%sm" (System.String.Join(";", gr |> Seq.map string)) let resetColor() = selectGraphicRendition [0] let setForeground i = selectGraphicRendition([30 + i]) let setBackground i = selectGraphicRendition([40 + i])256 colors is enough for everyone
Until then we’ve done nothing very interesting, after all the .Net console already support changing the console color to bright red, nothing new under the sun. But what the .Net console or Windows native API doesn’t support is the
38and48graphics sub-commands, extended foreground an background colors.let setExtendedForeground i = selectGraphicRendition [38; 5; i] let setExtendedBackground i = selectGraphicRendition [48; 5; i] let setForegroundRgb r g b = selectGraphicRendition [38; 2; r; g; b] let setBackgroundRgb r g b = selectGraphicRendition [48; 2; r; g; b]The first variant accept an index in a 256 colors table and the second specify the R, G and B components.
While all the terminal emulators I tested support both of them the colors the display will vary, especially for the R;G;B True Color mode. Some like macOS default terminal are pretty weird in the sense that it support 256 color mode but interpolate any R;G;B code to 16 colors.
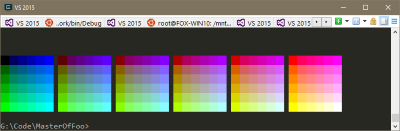
Let’s see what the palete looks like :
let extendedBlock i =
    for j in i..i+5 do
        setExtendedBackground j
        printf "  "

for row in 0..5 do
    for b in 0..5 do
        extendedBlock (16 + 36*b + row*6)
        resetColor()
        printf " "
    printfn ""
The result in VS Code (On macOS) :

We need to be true to our colors
Now that we know how to draw with true colors we can draw pictures on the terminal :
open System.Drawing

let showBitmap path =
    let bitmap = Image.FromFile(path) :?> Bitmap
    for y in 0..bitmap.Size.Height-1 do
        for x in 0..bitmap.Size.Width-1 do
            let px = bitmap.GetPixel(x, y)
            setBackgroundRgb (int px.R) (int px.G) (int px.B)
            printf "  "
        resetColor()
        printfn ""
And we can apply it to a 40x40px version of the FSharp logo :

The code for all of that can be found in a Gist.
I didn’t test the windows insider release so can’t tell how well microsoft True Color support in the native console works but it’s the next thing I want to try.
Appendix A: ConEmu color support
ConEmu support more than the standard 16 colors but if you try it, it won’t work directly, it seem that maybe for compatibility reasons the support isn’t always on.
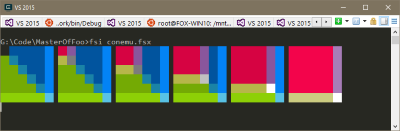
To trigger it an application must first scroll the terminal far away at least once with the
Tcommand :let scrollUp (lines: int) = printcsif "%iS" lines let scrollDown (lines: int) = printcsif "%iT" lines scrollDown 9999 setCursorPos 9999 1After that ConEnu will display what we expect :
Appendix B: Enabling escape codes in Windows default terminal
While the windows terminal support escape codes, it doesn’t do it directly. They need to be enabled using
SetConsoleModeAPI :#nowarn "9" module DllImports = open System.Runtime.InteropServices open Microsoft.FSharp.NativeInterop let INVALID_HANDLE_VALUE = nativeint -1 let STD_OUTPUT_HANDLE = -11 let ENABLE_VIRTUAL_TERMINAL_PROCESSING = 0x0004 [<DllImport("Kernel32")>] extern void* GetStdHandle(int nStdHandle) [<DllImport("Kernel32")>] extern bool GetConsoleMode(void* hConsoleHandle, int* lpMode) [<DllImport("Kernel32")>] extern bool SetConsoleMode(void* hConsoleHandle, int lpMode) let enableVTMode() = let handle = GetStdHandle(STD_OUTPUT_HANDLE) if handle <> INVALID_HANDLE_VALUE then let mode = NativePtr.stackalloc<int> 1 if GetConsoleMode(handle, mode) then let value = NativePtr.read mode let value = value ||| ENABLE_VIRTUAL_TERMINAL_PROCESSING SetConsoleMode(handle, value) else printfn "no get" false else printfn "no handle" false DllImports.enableVTMode() |> ignore - On windows ConEmu is still the best you can do, it’s buggy but usable. There is a little trick to
enable more than 16 colors but it’s easy and need to be done only once per session, I’ll explain how to do it
from code in Appendix A but you can simply display one of the ConEmu sample file with
-
ColoredPrintf is a very simple library that provide a
printf-like function with color support. A first version of the library is available on NuGet with it’s source code on my Github.The syntax to use for color is
$foreground;background[text]with the color names being the same as in the ConsoleColor enumeration.The main entry points of the library are the
colorprintfandcolorprintfnfunctions that have the same signature asprintfandprintfn(It uses my MasterOfFoo library for that).Example
colorprintfn "Hello $red[world]."
colorprintfn "Hello $green[%s]." "user"
colorprintfn "$white[Progress]: $yellow[%.2f%%] (Eta $yellow[%i] minutes)" 42.33 5
colorprintfn "$white;blue[%s ]$black;white[%s ]$white;red[%s]" "La vie" "est" "belle"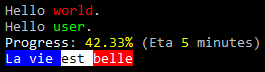
-
MasterOfFoo is an F# library that intend to facilitate writing functions that act like the native
printfone does.I presented it as an experiment during september’s Paris F# Meetup (See the summary in french) but I feel like it’s now ready to be tested by more people.
It is now available on nuget as a preview version of 0.1.2 and the source code is on GitHub.
The API is described in more details in the readme but here is a small taste of the possibilities with a proof-of-concept
sqlCommandfimplementation :module SqlCommandBuilder = open System.Text open BlackFox.MasterOfFoo open System.Data.Common open System.Data.SqlClient type internal SqlEnv<'Result, 'cmd when 'cmd :> DbCommand>(command: 'cmd, k) = inherit PrintfEnv<unit, unit, 'Result>(()) let queryString = StringBuilder() let mutable index = 0 override __.Finalize(): 'Result = command.CommandText <- queryString.ToString() k(command) override __.Write(s : PrintableElement) = let asPrintf = s.FormatAsPrintF() match s.ElementType with | PrintableElementType.FromFormatSpecifier -> let parameter = if typeof<DbParameter>.IsAssignableFrom(s.ValueType) then s.Value :?> DbParameter else let paramName = sprintf "@p%i" index index <- index + 1 let parameter = command.CreateParameter() parameter.ParameterName <- paramName parameter.Value <- s.Value parameter ignore(queryString.Append parameter.ParameterName) command.Parameters.Add parameter |> ignore | _ -> ignore(queryString.Append asPrintf) override __.WriteT(()) = () let sqlCommandf (format : Format<'T, unit, unit, SqlCommand>) = doPrintfFromEnv format (SqlEnv(new SqlCommand (), id)) let sqlRunf (connection: SqlConnection) (format : Format<'T, unit, unit, unit>) = let execute (cmd: SqlCommand) = cmd.ExecuteNonQuery() |> ignore doPrintfFromEnv format (SqlEnv(connection.CreateCommand(), execute)) // Create the parametrized query "SELECT * FROM users WHERE name=@p0" let cmd = sqlCommandf "SELECT * FROM users WHERE name=%s" "vbfox" sqlRunf connection "DELETE FROM users WHERE name=%s" "vbfox" -
Suave is an open source F# library implementing a web server in a functional style. The source code is on GitHub and releases are available on NuGet like most .NET open source projects these days.
You can find the full sample presented here as a Visual Studio 2015 project on my GitHub. I’m using Paket to get the
Suavepackage but the standard NuGet UI would work as well (albeit slower).The minimal hello world is simply :
open Suave [<EntryPoint>] let main argv = startWebServer defaultConfig (Successful.OK "Hello World!") 0startWebServeris a bloking function that take two parameters:- A
SuaveConfigobject defining the configuration, the default one opens a single non encrypted server on port 8083. - A
WebPartrepresenting everything that would be served. The type is actually an alias forHttpContext -> Async<HttpContext option>and suave provide a lot of filters & combinators to do standard things, like for example returning something different depending on the URL (Kinda expected for a web server).
Maybe i’ll blog more about the different combinators and how to combine them to reproduce a few common web server cases (Serving files, protecting access to some pages, …) but as this post is about IIS integration i’ll keep the hello world code and build from that.
IIS
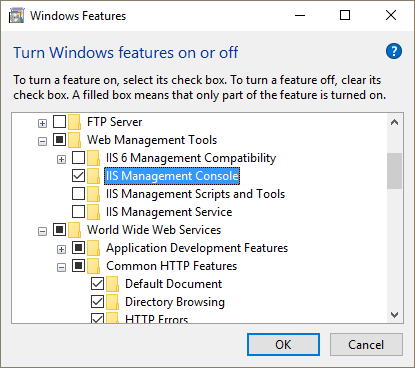
IIS is the Microsoft web server present by default on Windows Server & Desktops. If you don’t already have it on your dev machine it’s available from the Turn Windows features on or off in control panel. The entry is named Internet Information Services and you can either go with the defaults or get everything under there.
Once installed, start IIS Manager and create a website listening on a random port on IP address
127.0.0.1with a Physical path corresponding to thebin/Debugdirectory of the hello world project.HttpPlatformHandler
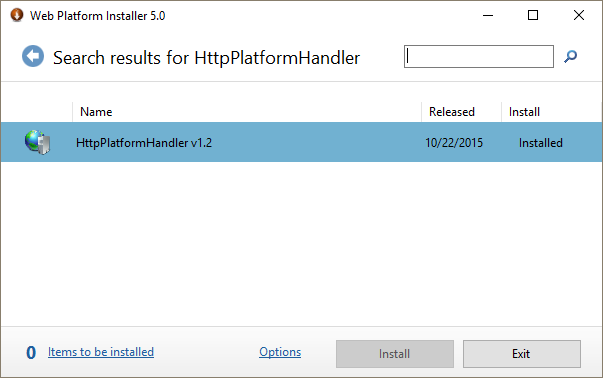
HttpPlatformHandler is an IIS addon that allow to use any http serving application where the executable is able to receive the port to listen to via an environment variable.
To start the web site IIS run the executable with the
HTTP_PLATFORM_PORTenvironment variable containing the port that it need to listen to and the module will then proxy requests to this port and sent back the response to the client. As the module insert itself inside the standard IIS processing it mean that things like logging, https certificates, respawning the process when an error happens or doing windows domain authentication can be handled by IIS without any change to the application code.To install it start the Web Platform Installer (Either from your start menu or from the right side actions in IIS Manager) and search for it.
To be able to enable it per-site like we’ll do in the next step, open IIS Manager and in the Feature View for the whole server, open Feature Delegation and enable Handlers Mappings as Read/Write.
Using web.config
IIS expect it’s configuration in an XML file named
web.configso you’ll need to add an xml file named like that to your project with Copy to Output Directory configured to Copy if newer with the content :<?xml version="1.0" encoding="UTF-8"?> <configuration> <system.webServer> <handlers> <remove name="httpplatformhandler" /> <add name="httpplatformhandler" path="*" verb="*" modules="httpPlatformHandler" resourceType="Unspecified" /> </handlers> <httpPlatform processPath="./SuaveIIS.exe" arguments="" stdoutLogEnabled="true" stdoutLogFile="./SuaveIIS.log" startupTimeLimit="20" requestTimeout="00:05:00"> </httpPlatform> </system.webServer> </configuration>This assume that your exectutable is named
SuaveIIS.exeso adapt accordingly.For this to work you’ll also need to authorize IIS to read it, do to that open Explorer and change the Permissions on the
binfolder to allow read & write access by the localIIS_IUSRSgroup.Getting the port to listen to from F# Code
In the current state, HttpPlatformHandler will start your executable, kill it after 20s and restart it in a loop because it will never see it listening on it’s specified port so we need to read the port from the environment variable :
module IISHelpers =
    open System

    /// Port specified by IIS HttpPlatformHandler
    let httpPlatformPort =
        match Environment.GetEnvironmentVariable("HTTP_PLATFORM_PORT") with
        | null -> None
        | value ->
            match Int32.TryParse(value) with
            | true, value -> Some value
            | false, _ -> None
And then when we detect that we’re started from IIS (Because
IISHelpers.httpPlatformPortisSome) we can configure Suave to listen locally on that port and nowhere else :open Suave [<EntryPoint>] let main argv = let config = defaultConfig let config = match IISHelpers.httpPlatformPort with | Some port -> { config with bindings = [ HttpBinding.mkSimple HTTP "127.0.0.1" port ] } | None -> config startWebServer config (Successful.OK "Hello World!") 0If you compile it and visit your IIS site in a browser you should see your Hello World being served by IIS.
Remarks
- If you can’t compile because the executable file is already it mean that your executable
is running in IIS. What you need to do is to remove the
web.configfile from thebin/Debugdirectory, IIS will take this as a hint that your configuration changed and that it need to stop using your binary.
- A
-
LINQPad is one of my favorite tools for C# development it allow for fast development of small bits of C# to prototype or answer StackOverflow questions.

The original feature was to allow easy scripting of databases by providing a LINQ to SQL view of all objects of a connection directly as members of the generated script class. But LINQPad is a lot more generic and can serve as a C# swiss army knife for a lot of utility scripts.
Searching for NuGet packages
The Free and Pro editions of LINQPad don’t give you access to the ability to reference NuGet packages directly and the NuGet website doesn’t provide any download link. We’ll use LINQPad itself to be able to search and download any package by Id.
The first thing we need to do is to get access to the list of packages. If possible not in the HTML tag-soup form…
Turns out that NuGet API is partially OData-XML and partially some REST endpoint. As LINQPad natively support OData I’ll use only that. To use it, add a new connection of type WCF Data Services pointing to
https://www.nuget.org/api/v2/and then create a C# Program query using this connection.To start exploring we’ll select some data to look at what fields are available and how they look:
void Main() { Packages.Take(10).Dump(); }Dumpis a method that display an object in the output with a graphical representation. For tabular data (IQueryable,IEnumerable, …) passing true as first argument will show it in a DataGrid.To search for a package we will want to filter by
Idand get only the latest non-prerelease version so the fields we are interested in areIsAbsoluteLatestVersionandIsPrereleasein addition toId:void Main() { var search = Util.ReadLine("Id"); var packages = from package in Packages where package.IsAbsoluteLatestVersion && !package.IsPrerelease && package.Id.StartsWith(search) select package; packages.Dump(true); }This version of the code also introduce
Util.ReadLinea method that display an input line at the bottom of the LINQPad output.Adding download links
Now that we have all info from our package we need the download URL, turns out that it isn’t directly included in the data but we should be able to build it from the information we already have.
As NuGet is open-source we can read the source code and find how package download urls are constructed :
// Route to get packages
routes.MapDelegate("DownloadPackage",
                   "api/v2/package/{packageId}/{version}",
                   new { httpMethod = new HttpMethodConstraint("GET") },
                   context => CreatePackageService().DownloadPackage(context.HttpContext));
We know
versionandpackageIdso we can now display the download URL.But LINQPad allow us to do a lot more: the
Hyperlinqtype is a magic one that when passed toDumpshow a clickable link in the output window.The link can be constructed with an
Actiondelegate that will be executed when clicked but for such a simple case we’ll use the version taking directly an URL:foreach(var package in packages) { var url = string.Format(@"https://www.nuget.org/api/v2/package/{0}/{1}", package.Id, package.Version); var text = string.Format(@"{0} (v{1})", package.Id, package.Version); new Hyperlinq(url, text).Dump(); }Which give us a nice clickable list of packages starting with a string directly in LINQPad output :

Pricing
Regarding the price for free you get the basic UI, the Pro versions is at 40$ (Autocompletion) and the Premium (Direct SQL table editing + NuGet) is at 75$.
The price is small (and often discounted) but as Roslyn is Open Source and make creating IDE text editors with auto-completion a lot easier I expect movement in this space especially for the Pro version features.