-
After years of usage I started to find FAKE’s
Targetsyntax less expressive than it could be.I developed multiple variants of a “Task” library to replace it that was available via gist, sometimes tweeting about it in answer to discussions but never clearly releasing it.
With FAKE 5 moving to small modules it’s the occasion to choose a good name “
BuildTask” and release it on NuGet with the source code on GitHub.What does BuildTask changes
Strongly-Typed targets
Targethas a very stringly-typed API, strings are used everywhere as identifiers, with the consequence that their value is only verified when the script is executed.Target.create "Default" (fun _ -> (* ... *) ) Target.runOrDefault "Defautl"In
BuildTaskeach created task returns a value that represent it and the compiler check the value usage as with any other variable.let defaultTask = BuildTask.createFn "Default" [] (fun _ -> (* ... *) ) BuildTask.runOrDefault defaultTaskDefault syntax using computation expressions
While FAKE
Target.createexpect a function as parameterBuildTask.createuses a computation expression to do the same (Like Expecto), removing a little bit of verbosity for each target:Target.create "Default" (fun _ -> (* ... *) )BuildTask.create "Default" [] { (* ... *) }Note:
BuildTask.createFnstill provide the function-syntax if you need it.Dependencies
The biggest change is the dependency syntax,
Targetrely on operators chaining (or methods doing the same) and the result looks good for linear dependencies:"Clean" ==> "BuildApp" ==> "BuildTests" ==> "Test" ==> "PackageApp" ==> "Default" ==> "CI"But the dependencies here are simplified, they don’t reflect the reality of target dependencies. Clean shouldn’t be mandatory except on CI, packaging the app shouldn’t mandate running the tests and building the tests shouldn’t require building the app.
The real dependencies are more like:
"Clean" =?> "BuildApp"
"Clean" =?> "BuildTests"
"Clean" ==> "CI"
"BuildApp" ==> "PackageApp"
"BuildTests" ==> "Test"
"PackageApp" ==> "Default"
"Test" ==> "Default"
"Default" ==> "CI"
And while the linear version was pretty readable, it isn’t the case here.
The reason is that we are defining a directed acyclic graph by listing its edges, but there is another text representation of a DAG that is much more readable: listing all preceding vertex for each vertex.
It’s a syntax that is already used by tools similar to FAKE like Gulp :
gulp.task("css", function() { /* ...*/ }); gulp.task("js", function() { /* ...*/ }); gulp.task("test", ["js"], function() { /* ...*/ }); gulp.task("default", ["css", "test"], function() { /* ...*/ });BuildTaskuses a similar syntax:let clean = BuildTask.create "Clean" [] { (* ... *) } let buildApp = BuildTask.create "BuildApp" [clean.IfNeeded] { (* ... *) } let packageApp = BuildTask.create "PackageApp" [buildApp] { (* ... *) } let buildTests = BuildTask.create "BuildTests" [clean.IfNeeded] { (* ... *) } let test = BuildTask.create "Test" [buildTests] { (* ... *) } let defaultTask = BuildTask.createEmpty "Default" [packageApp; test] let ci = BuildTask.createEmpty "CI" [clean; defaultTask]Ordering
The direct consequence of the strongly-typed syntax along with the dependency syntax is that
BuildTaskenforces a strict ordering of the build script. Exactly as F# requires for functions inside a module.While I feared this consequence at first, after converting quite a lot of FAKE scripts it’s easy to adopt and make the build script order more logical for developers familiar with F#.
Getting started samples
Here are a few of the samples on the FAKE getting started page ported to
BuildTask:#r "paket: nuget BlackFox.Fake.BuildTask nuget Fake.Core.Target //" #load "./.fake/build.fsx/intellisense.fsx" open BlackFox.Fake open Fake.Core // Default target let defaultTask = BuildTask.create "Default" [] { Trace.trace "Hello World from FAKE" } // start build BuildTask.runOrDefault defaultTaskCLEANING THE LAST BUILD OUTPUT:
#r "paket:
nuget BlackFox.Fake.BuildTask
nuget Fake.IO.FileSystem
nuget Fake.Core.Target //"
#load "./.fake/build.fsx/intellisense.fsx"

open BlackFox.Fake
open Fake.Core
open Fake.IO

// Properties
let buildDir = "./build/"

// Targets
let cleanTask = BuildTask.create "Clean" [] {
  Shell.CleanDir buildDir
}

let defaultTask = BuildTask.create "Default" [cleanTask] {
  Trace.trace "Hello World from FAKE"
}

// start build
BuildTask.runOrDefault defaultTask
Conclusion
I invite any FAKE user whenever they like the current syntax or not to try it (NuGet) and tell me what they think on twitter or in a GitHub issue.
-
Stidgen is an old (4 years) project of mine that was created to fill a professional need but that I never really advertised until now. The name stands for “Strongly Typed ID types GENerator”.
What it does is to generate C# types to wrap simple types used as identifiers (
string->UserId,Guid->TweetId, …) to have nicely typed code.A simple
.stidgenfile (The format is documented on the readme) with the following content :public UserId<string> public CompanyId<string> public UploadedFileId<Guid>Generate a 837 lines file, the types can then be used to get readable type signatures :
interface IPopulationQueries
{
    UserInfo GetUserInfo(UserId id);
    CompanyId GetUserCompany(UserId id);
    IReadOnlyCollection<UserId> GetCompanyUsers(CompanyId id);
}
Usage
The latest version of stidgen is available as a dotnet code (2.1+) tool. It can be installed globally like that :
dotnet tool install --global stidgenand can the be used from anywhere :
stidgen samples/Simple.stidgenAs a dotnet tool it can also be installed in a project and used from CI/FAKE. (No official FAKE module yet, it’ll come)
What ID types provide
A very simple wrapper type can be generated by hand in a dozen of lines but stidgen provide a lot more features by default :
- An immutable structure with a single member, something that the JIT can recognize and optimize away.
- Casts from/to the underlying types.
- Equality members, interfaces and operators.
- Interning of string when it’s the underlying type, with nice optimizations to Equal and GetHashCode. I’ll try to blog about them it’s quite an interesting optimization.
ToString()and formattable overloads are lifted.DebuggerDisplayis present to simplify debugging.- Optional protobuf-net attributes generation.
Comparison with F# solution
While stidgen is written in F# it doesn’t provide a way to generate ID types in F#. One of the reason is that generating formatted F# code is quite hard, but the other is that there is already 80% of the features directly available in the language.
The solution to the same problem in F# is to use a single-case discriminated union:
[<Struct>]
type UserId = | UserId of string

[<Struct>]
type CompanyId = | CompanyId of string

[<Struct>]
type UploadedFileId = | UploadedFileId of Guid
And F# nicely provide most of what stidgen does by default (Equality interfaces and operators, immutability) but there are still a few missing things so maybe one day i’ll work on a F# generator :
- No way to automatically intern strings
- No interning-specific optimizations.
- No check for null (Producing nulls in F# is rare but .NET corelib/libraries can produce them)
ToStringisn’t handled- No
DebuggerDisplay
Note: Stidgen generated types works very nicely from F#
The code
Stidgen is an F# project that uses Roslyn the C# compiler platform to generate nicely formatted code automatically.
The
FluentRoslyn.fsfile in the respository contains an F# wrapper for Roslyn code generation that produce code like that :if' (equals info.ThisValueMemberAccess Literal.Null) (block [| ret (invocation (dottedMemberAccess' ["System"; "Convert"; m.Name]) [| Literal.Null |]) |])Conclusion
Stidgen is a project that we use extensively at work but I feel that we might not be the only ones that want strongly typed code in a C# codebase. So if you have this need or a similar one, why not try it ?
-
To optimize React we’ll need to dig into how it works and I’ll show a series of specific optimizations to use.
The post is part of a series on Fable / React optimizations split in 3 parts:
- React in Fable land
- Optimizing React (This one)
- Applying to Elmish
How does React work
The mechanism is described in a lot of details on the Reconciliation page of React documentation, I won’t repeat the details but essentially React Keep a representation of what it’s element tree is currently, and each time a change need to propagate it will evaluate what the element tree should now be and apply the diff.
A few rules are important for performance:
- Change of element type or component type makes React abandon any DOM diffing and the old tree is
destroyed in favor of the new one.
- This should be a rare occurrence, any big DOM change is pretty slow as it will involve a lot of destruction / creation by the browser and a lot of reflowing.
- On the other hand we want this to happen if we know that the HTML elements under some Component will drastically change: no need to force React to diff 100s of elements if we know that it’s a very different page that is shown. The diff also has a price.
- React mostly compares elements in order so adding an element at the start of a parent will
change ALL children. The
keyattribute should be used to override this behaviour for anything that is more or less a list of elements.- Keys should also be stable, an array index for example is a pretty bad key as it’s nearly what React does when there are no keys.
- The fastest way to render a component is to not render it at all, so
shouldComponentUpdate(AndPureComponentthat is using it) are the best tools for us. - Functional components are always rendered, but they are cheaper than normal ones as all the lifetime methods are bypassed too.
We can roughly consider for optimization purpose that each component in the tree is in one of these 4 states after each change (ordered from better performance-wise to worse) :
- Not considered (Because its parent wasn’t re-rendered) ❄️❄️
- Returned false to
shouldComponentUpdate❄️ - Render was called but returned the same tree as before 🔥
- Render was called but the tree is different and the document DOM need to be mutated 🔥🔥
PureComponent
The first optimization that is especially useful for us in F# is the
PureComponent. It’s a component that only updates when one of the elements in its props or state changed and the comparison is done in a shallow way (by comparing references).It’s ideal when everything you manipulate is immutable, you know, like F# records 😉.
Let’s take a small sample to see how it’s good for us. Test it as-is and with the
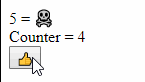
Componentreplaced with aPureComponent:type Canary(initialProps) = inherit Component<obj, obj>(initialProps) // <-- Change to PureComponent here let mutable x = 0 override this.render() = x <- x + 1 div [] [ofInt x; str " = "; str (if x > 1 then "☠️" else "🐤️") ] let inline canary () = ofType<Canary,_,_> createEmpty [] type CounterState = { counter: int } type Counter(initialProps) as this = inherit Component<obj, CounterState>(initialProps) do this.setInitState({ counter = 0}) let add = this.Add member this.Add(_:MouseEvent) = this.setState({ counter = this.state.counter + 1 }) override this.render() = div [] [ canary () div [] [ str "Counter = "; ofInt this.state.counter ] button [OnClick add] [str "👍"] ] let inline counter () = ofType<Counter,_,_> createEmpty [] let init() = ReactDom.render(counter (), document.getElementById("root"))Before:
After:
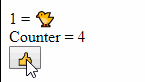
While our canary has no reason to update, each time the button is clicked it will actually re-render. But as soon as we convert it to a
PureComponentit’s not updating anymore: none of its props or state change so react doesn’t even callrender().Beware: Passing functions
If you look in the previous samples, each time I pass a function it’s never a lambda declared directly in
render()or even a member reference but it’s a field that points to a member.The reason for that is that for react to not apply changes for DOM elements or for
PureComponentthe references must be the same and lambdas are re-recreated each time so their reference would be different.But members? Members stay the same so we should be able to pass
this.Addand have it work. But JavaScript is a weird language where passingthis.Addwould pass the method add without anythisattached, so to keep the semantic of the F# language Fable helpfully do it for us and transpiles it tothis.Add.bind(this)instead. But this also re-creates a reference each time so we must capture the bound version in a variable during the construction of the object.It’s hard to prove it with the
buttonso let’s prove it by moving the button creation to our lovely 🐤:type CanaryProps = { add: MouseEvent -> unit } type Canary(initialProps) = inherit PureComponent<CanaryProps, obj>(initialProps) let mutable x = 0 override this.render() = x <- x + 1 div [] [ button [OnClick this.props.add] [str "👍"] span [] [ofInt x; str " = "; str (if x > 1 then "☠️" else "️️️🐤️") ] ] let inline canary props = ofType<Canary,_,_> props [] type CounterState = { counter: int } type Counter(initialProps) as this = inherit Component<obj, CounterState>(initialProps) do this.setInitState({ counter = 0}) let add = this.Add member this.Add(_:MouseEvent) = this.setState({ counter = this.state.counter + 1 }) override this.render() = div [] [ canary { add = add } canary { add = this.Add } canary { add = (fun _ -> this.setState({ counter = this.state.counter + 1 })) } div [] [ str "Counter = "; ofInt this.state.counter ] ] let inline counter () = ofType<Counter,_,_> createEmpty [] let init() = ReactDom.render(counter (), document.getElementById("root"))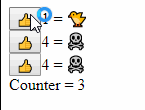
Using
toArray/toListand refsIt’s tempting in F# to use list expressions to build React children even when we have lists as it allows for a very nice syntax, but it can be a performance problem and force useless renders. Let’s see a problematic sample:
type CanaryProps = { name: string }

type Canary(initialProps) =
    inherit PureComponent<CanaryProps, obj>(initialProps)
    let mutable x = 0
    override this.render() =
        x <- x + 1
        div [] [str (if x > 1 then "☠️" else "️️️🐤️"); str " "; str this.props.name ]

let inline canary props = ofType<Canary,_,_> props []

let goodNames = ["Chantilly"; "Pepe"; "Lester"; "Pete"; "Baby"; "Sunny"; "Bluebird"]

type CanariesState = { i: int; names: string list }

type Counter(initialProps) as this =
    inherit Component<obj, CanariesState>(initialProps)
    do
        this.setInitState({ i = 0; names = [] })

    let add = this.Add

    member this.Add(_:MouseEvent) =
        let name = goodNames.[this.state.i % goodNames.Length]
        let names = name :: this.state.names
        this.setState({ i = this.state.i + 1; names = names })

    override this.render() =
        div [] [
            yield button [OnClick add] [str "🥚"]
            yield! this.state.names |> List.map(fun n -> canary { name = n })
        ]

let inline counter () = ofType<Counter,_,_> createEmpty []

let init() =
    ReactDom.render(counter (), document.getElementById("root"))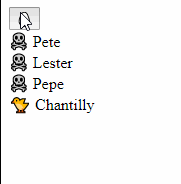
It seem that Chantilly survives but in fact it’s an illusion, a new element is always created at the end with his name, and all others are mutated.
So let’s fix it by exposing an array via
toListand assigning an unique key to all our canaries:type CanaryProps = { key: string; name: string } type Canary(initialProps) = inherit PureComponent<CanaryProps, obj>(initialProps) let mutable x = 0 override this.render() = x <- x + 1 div [] [str (if x > 1 then "☠️" else "️️️🐤️"); str " "; str this.props.name ] let inline canary props = ofType<Canary,_,_> props [] let goodNames = ["Chantilly"; "Pepe"; "Lester"; "Pete"; "Baby"; "Sunny"; "Bluebird"] type CanariesState = { i: int; canaries: (int*string) list } type Counter(initialProps) as this = inherit Component<obj, CanariesState>(initialProps) do this.setInitState({ i = 0; canaries = [] }) let add = this.Add member this.Add(_:MouseEvent) = let name = goodNames.[this.state.i % goodNames.Length] let canaries = (this.state.i,name) :: this.state.canaries this.setState({ i = this.state.i + 1; canaries = canaries }) override this.render() = div [] [ button [OnClick add] [str "🥚"] this.state.canaries |> List.map(fun (i,n) -> canary { key = i.ToString(); name = n }) |> ofList ] let inline counter () = ofType<Counter,_,_> createEmpty [] let init() = ReactDom.render(counter (), document.getElementById("root"))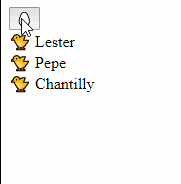
We could have kept using
yield!instead of usingofListand it would have worked here with only the keys but it’s better to always useofList.By using it an array is passed to React and it will warn us on the console if we forget to use
key.It also creates a new scope, avoiding problems if we wanted to show another list in the same parent with keys in common (duplicate keys under a same parent aren’t supposed to happen).
Functional components in other modules
OBSOLETE: This problem doesn’t affect Fable 2
This is more of a current Fable issue/bug that might be solved at some point than something coming from React but it can wreck performance completely.
The problem is that while directly referencing a function like
List.map foowill generate something likelistMap(foo). Doing the same with a function that is exposed by a moduleList.map m.foowill generatelistMap(foo.m.bind(foo)). It’s necessary when the target function is a javascript one as some of them require it but is useless for F# functions. Fable isn’t currently smart enough to differentiate them.Fable was actually doing it for all function creating the problem for all Functional components but I fixed it in a PR released as part of Fable 1.3.8
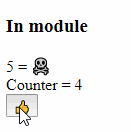
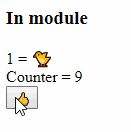
This problem has exactly the same cause as the one evoked in Beware: Passing functions but it has a simple workaround: use the function via
ofFunctionin the same module in a non-inline function and expose that instead of the Functional Component itself.// The variable need to be extracted because what happens is worse // than just render() being called multiple time: The whole component // is re-created on each change ! let mutable x = 0 type Canary(initialProps) = inherit PureComponent<obj, obj>(initialProps) override this.render() = x <- x + 1 div [] [ofInt x; str " = "; str (if x > 1 then "☠️" else "🐤️") ] let inline canary () = ofType<Canary,_,_> createEmpty [] module WrapperModule = let Wrapper(props: obj) = div [] [ h3 [] [str "In module"] canary () ] // XXXXXXXXXXXXXXXXXXXXXXXXXXXXXXXXXXXXXXXXXXXXXXXXXXXXXXX // Remove 'inline' here and the problem is solved, MAGIC ! // XXXXXXXXXXXXXXXXXXXXXXXXXXXXXXXXXXXXXXXXXXXXXXXXXXXXXXX let inline wrapper () = ofFunction Wrapper createEmpty [] type CounterState = { counter: int } type Counter(initialProps) as this = inherit Component<obj, CounterState>(initialProps) do this.setInitState({ counter = 0}) let add = this.Add member this.Add(_:MouseEvent) = this.setState({ counter = this.state.counter + 1 }) override this.render() = div [] [ WrapperModule.wrapper() div [] [ str "Counter = "; ofInt this.state.counter ] button [OnClick add] [str "👍"] ] let inline counter () = ofType<Counter,_,_> createEmpty [] let init() = ReactDom.render(counter (), document.getElementById("root"))Before:
After:
Letting React concatenate
While it’s only important with very frequent updates a little detail that can be interesting to look at is how strings are concatenated. The 3 choices are (from better to worse performance):
override this.render() =
    ul [] [
        // React will use it's DOM diffing and provide very fast update
        li [] [ str "Hello, "; str this.props.name]

        // Javascript concatenation is a also very fast
        li [] [ str ("Hello, " + this.props.name)]

        // sprintf is more complex and slower, it's perfectly fine for
        // elements that don't render very often but it's not free
        li [] [ str (sprintf "Hello, %s" this.props.name)]
    ]
That’s all folks
Not a lot more to say, avoid
render(), don’t kill the 🐤️🐤️🐤️ in the Fable mine and everything will be fine !Next article will be on Elmish and how it ties with all of that.
-
Fable coupled with Fable.React and Fable.Elmish.React are powerful tools to generate javascript applications. But generating good and fast React code is an already complex task that isn’t made simpler by using a different language and a transpiler.
In this series of posts I plan to show how some common React constructs are done in F# and what to look for when optimizing them.
The posts will be:
- React in Fable land (This one)
- Optimizing React
- Applying to Elmish
Starting a sample Fable React project
If you want to try the code for yourself you’ll need a sample
- Start with the fable template as in the minimal template
- Run it in watch mode with
npm startand connect to it via http://localhost:8080/ - Replace the
divtag inpublic/index.htmlwith<div id="root"></div> - Change the
App.fsfile to look like that:
module App

open Fable.Core
open Fable.Core.JsInterop
open Fable.Import
open Fable.Import.Browser
open Fable.Import.React
open Fable.Helpers.React
open Fable.Helpers.React.Props

// -- [BEGIN] part to replace
let init() =
    let element = str "Hello 🌍"
    ReactDom.render(element, document.getElementById("root"))
// -- [END] part to replace

init()
Creating HTML elements
As F# doesn’t have any JSX-like transform creating React elements is done as explained in the React Without JSX article, except that instead of directly using
createElementa bunch of helpers are available in theFable.Helpers.Reactmodule.For HTML elements the resulting syntax is strongly inspired by the Elm one.
Here is a small sample of the more common ones :
let init() =
    let element =
        // Each HTML element has an helper with the same name
        ul
            // The first parameter is the properties of the elements.
            // For html elements they are specified as a list and for custom
            // elements it's more typical to find a record creation
            [ClassName "my-ul"; Id "unique-ul"]

            // The second parameter is the list of children
            [
                // str is the helper for exposing a string to React as an element
                li [] [ str "Hello 🌍" ]

                // Helpers exists also for other primitive types
                li [] [ str "The answer is: "; ofInt 42 ]
                li [] [ str "π="; ofFloat 3.14 ]

                // ofOption can be used to return either null or something
                li [] [ str "🤐"; ofOption (Some (str "🔫")) ]
                // And it can also be used to unconditionally return null, rendering nothing
                li [] [ str "😃"; ofOption None ]

                // ofList allows to expose a list to react, as with any list of elements
                // in React each need an unique and stable key
                [1;2;3]
                    |> List.map(fun i ->
                        let si = i.ToString()
                        li [Key si] [str "🎯 "; str si])
                    |> ofList

                // fragment is the <Fragment/> element introduced in React 16 to return
                // multiple elements
                [1;2;3]
                    |> List.map(fun i ->
                        let si = i.ToString()
                        li [] [str "🎲 "; str si])
                    |> fragment []
            ]
    ReactDom.render(element, document.getElementById("root"))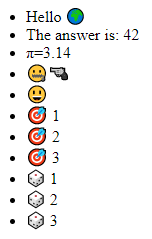
React components
While it is possible to use React as a templating engine for HTML by using only built-in components, what really unlocks the power of React and where lies the biggest potential for optimization is in its user-defined components.
Creating Components in F# is really similar to how they are created in modern JavaScript. The main difference comes when consuming them as we’ll use the
ofTypeandofFunctionhelpers (Instead of using JSX orReact.createElement).Functional Components
The easiest to use F# components are Functional ones, they don’t need a class, a simple function taking props and returning a
ReactElementwill do. They can then be created using theofTypehelper.Let’s see how they are created in JavaScript:
function Welcome(props) {
  return <h1>Hello, {props.name}</h1>;
}

function init() {
    const element = <Welcome name="🌍" />;
    ReactDOM.render(element, document.getElementById("root"));
}
And the equivalent in F#:
type WelcomeProps = { name: string }

let Welcome { name = name } =
    h1 [] [ str "Hello, "; str name ]

let inline welcome name = ofFunction Welcome { name = name } []

let init() =
    let element = welcome "🌍"
    ReactDom.render(element, document.getElementById("root"))
Some notes:
- We had to declare
WelcomePropswhile JavaScript could do without - Using
sprintfin the F# sample could have seemed natural but using React for it is a lot better on a performance standpoint as we’ll see later.
Note: Due to some peculiarities of the Fable transform there can be negative performance impact of using them but they are avoidable if you know what to look for. I’ll detail this some more in the second post
Class Components
To create an user-defined component in F# a class must be created that inherit from
Fable.React.Component<'props,'state>and implement at least the mandatoryrender()method that returns aReactElement.Let’s port our “Hello World” Component:
type WelcomeProps = { name: string }

type Welcome(initialProps) =
    inherit Component<WelcomeProps, obj>(initialProps)
    override this.render() =
        h1 [] [ str "Hello "; str this.props.name ]

let inline welcome name = ofType<Welcome,_,_> { name = name } []

let init() =
    let element = welcome "🌍"
    ReactDom.render(element, document.getElementById("root"))
Nothing special here, the only gotcha is that the props passed in the primary constructor even though they are in scope in the
render()method should not be used.Class Component with state
All features of React are available in Fable and while the more “Functional” approach of re-rendering with new props is more natural using mutable state is totally possible :
// A pure, stateless component that will simply display the counter
type CounterDisplayProps = { counter: int }

type CounterDisplay(initialProps) =
    inherit PureStatelessComponent<CounterDisplayProps>(initialProps)
    override this.render() =
        div [] [ str "Counter = "; ofInt this.props.counter ]

let inline counterDisplay p = ofType<CounterDisplay,_,_> p []

// Another pure component displaying the buttons
type AddRemoveProps = { add: MouseEvent -> unit; remove: MouseEvent -> unit }

type AddRemove(initialProps) =
    inherit PureStatelessComponent<AddRemoveProps>(initialProps)
    override this.render() =
        div [] [
            button [OnClick this.props.add] [str "👍"]
            button [OnClick this.props.remove] [str "👎"]
        ]

let inline addRemove props = ofType<AddRemove,_,_> props []

// The counter itself using state to keep the count
type CounterState = { counter: int }

type Counter(initialProps) as this =
    inherit Component<obj, CounterState>(initialProps)
    do
        this.setInitState({ counter = 0})

    // This is the equivalent of doing `this.add = this.add.bind(this)`
    // in javascript (Except for the fact that we can't reuse the name)
    let add = this.Add
    let remove = this.Remove

    member this.Add(_:MouseEvent) =
        this.setState({ counter = this.state.counter + 1 })

    member this.Remove(_:MouseEvent) =
        this.setState({ counter = this.state.counter - 1 })

    override this.render() =
        div [] [
            counterDisplay { CounterDisplayProps.counter = this.state.counter }
            addRemove { add = add; remove = remove }
        ]

let inline counter props = ofType<Counter,_,_> props []

// createEmpty is used to emit '{}' in javascript, an empty object
let init() =
    let element = counter createEmpty
    ReactDom.render(element, document.getElementById("root"))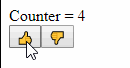
Note: This sample uses a few react-friendly optimizations that will be the subject of the second post.
That’s all folks
Nothing special this time and for anyone that know both React and Fable there was not a lot of new information but we’ll expand it next time !
-
This post is part of the F# Advent Calendar in English 2017 organized by Sergey Tihon
Ionide is now one of the most used F# editing experience but it’s pretty unique as it’s based on an easily extensible editors: Visual Studio Code.
In the world of VSCode extensibility no arcane knowledge is required, the editor is open source with a well written code base (in TypeScript), the plugin API is easy to get into and most plugins are open source too. While the Javascript (Or TypeScript) language might not be to the taste of everyone, we have Fable allowing us to continue to write F# and run in in the Javascript VM.
And Ionide is written in Fable, so we’ll use Ionide and VSCode to edit Ionide itself.
Let’s implement a very simple feature and then move to a bigger one! The simple feature will be to add a button in the editor when
.fsxfiles are edited to call theFSI: Send Filecommand, sending the full file to F# interactive. The more complex one will be to run the file in the terminal.Getting started
First you’ll need the prerequisites (VScode, F#, dotnet, yarn, node, …) then let’s checkout a commit without the feature, run a first full build and start code :
git clone git@github.com:ionide/ionide-vscode-fsharp.git
cd ionide-vscode-fsharp
git checkout -b having_fun c0922fc
build build
code .
Once this first full build is setup well start our developer loop in VS Code:
- In the Integrated terminal (View > Integrated Terminal menu) we run
build watch: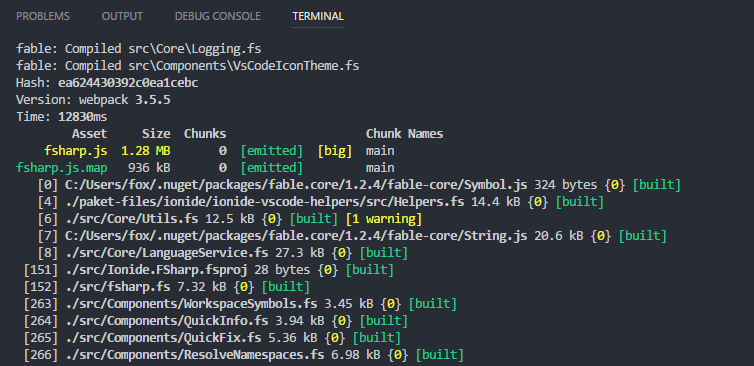
- In the debug view we select the
Launch Onlyconfiguration:
- Press
F5to start a debug instance of VS Code.
Once started our loop is simple :
- Type new buggy code.
- Wait for the terminal to show that it rebuilt it successfully
- Move to the debug instance and press
F1to runReload Window - Test
- Repeat
The loop is fast and while not as good as a browser with auto-reloading, pretty nice to use.
A JSON-only feature
Our first target is to get something like that:
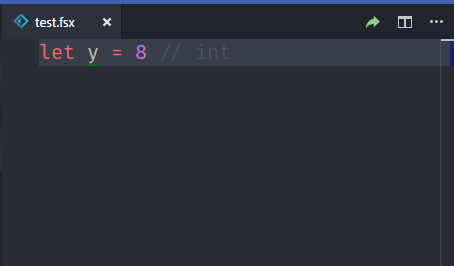
And we actually don’t need any code to do it, as the command already exists the only thing we need to do is to to change the
release/package.jsonfile. And as added bonus it’s not something that is build but instead used as-is by Code so we don’t even need to wait for the watch build to test it, simply reloading the test instance window will allow us to see our changes.While the file contains the same field as any
package.jsonfile, it’s a section specific to Code that interest us :contributes. It contains all of the different things that the Ionide extensions declare that it’s able to provide and it’s well documented on VS Code website.The command we want to run is shown as
FSI: Send Filein the command palette but to run it we’ll need it’s ID and that can be found in thecommandssection.{ "contributes": { "commands": [ { "command": "fsi.SendFile", "title": "FSI: Send File" } ] } }We currently want to show it in the editor title menu bar that is documented as being the
editor/titlesection insidemenu, so let’s add it:{ "contributes": { "menus": { "editor/title": [ { "command": "fsi.SendFile", "when": "editorLangId == 'fsharp' && resourceExtname == '.fsx'", "group": "navigation" } ], } } }A few notes here:
commandis the command we wants to run, that we found just beforewhenis the condition for it to appear, we want to be sure that the file is marked as F# (The language ID is auto detected but the user can also change it manually via the selector on the bottom right) and that it’s a script (Sending.fsfiles is possible but we don’t want to suggest it so prominently in the UI)groupis used to group related commands butnavigationis special as it tell code to make the item visible directly as an icon instead of being a line in the...menu (the default)
Note:
resourceExtnameis a feature that was added to VS Code by Krzysztof Cieślak, the author of Ionide specifically for this change!We reload the window and…
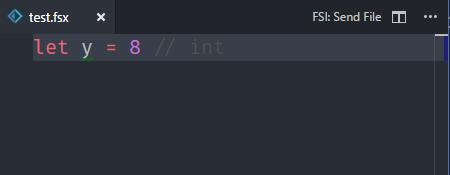
We forgot the icon 😢
Turns out that the icon is declared along with the command (And show everywhere the command is shown) instead of being part of the menu, so we’ll get back to the command definition and add the icon
{
  "contributes": {
    "commands": [
      {
        "command": "fsi.SendFile",
        "title": "FSI: Send File",
        "icon":
        {
          "light": "./images/send-light.svg",
          "dark": "./images/send-dark.svg"
        }
      }
    ]
  }
}
The images need to be placed in the
release/imagefolder and to start copying existing ones is good enough. There are 2 images to allow for small variations between light and dark themes, buticoncan also be the path to a single image if the distinction isn’t needed.And finally our feature is here, we can test it and verify that it works as expected, job done 🙌.
Adding our own command
Now let’s add another small feature: Running FSX scripts in the terminal
To do that well go back to
package.jsonand add our new command:{ "contributes": { "commands": [ { "command": "fsharp.scriptrunner.run", "title": "F#: Run script", "icon": { "light": "./images/run-light.svg", "dark": "./images/run-dark.svg" } } ], "menus": { "commandPalette": [ { "command": "fsharp.scriptrunner.run", "when": "editorLangId == 'fsharp' && resourceExtname == '.fsx'" } ], "editor/title": [ { "command": "fsharp.scriptrunner.run", "when": "editorLangId == 'fsharp' && resourceExtname == '.fsx'", "group": "navigation" } ] ] } } }We’ll also need to add a new file to host our code in
src/Components/ScriptRunner.fsand add it to the.fsprojfile. (After this step thewatchscript might need to be restarted manually to pickup the new file)namespace Ionide.VSCode.FSharp open System open Fable.Core open Fable.Import.vscode open Fable.Import.Node module ScriptRunner = let private runFile () = printfn "Hello world" let activate (context: ExtensionContext) = commands.registerCommand( "fsharp.scriptrunner.run", runFile |> unbox<Func<obj,obj>>) |> context.subscriptions.AddAdding the call to activate in
fsharp.fsxis the final touch and our new button will finally do something (Even if it’s only writing “Hello world” to the Debug Console)// ... Forge.activate context Fsi.activate context // <--- Line added here ScriptRunner.activate context { ProjectLoadedEvent = Project.projectLoaded.event BuildProject = MSBuild.buildProjectPath "Build" GetProjectLauncher = Project.getLauncher DebugProject = debugProject }Finally, we write some code
Let’s start with the most simple addition, creating a terminal with a fixed name that run
fsi.exewith the current file as single parameterlet private runFile () = let scriptFile = window.activeTextEditor.document.fileName let terminal = window.createTerminal("script", Environment.fsi, [| scriptFile|]) terminal.show ()It works but show a big problem with our approach as it closes immediately the terminal, before we can even read the results of executing our script.
A solution to this problem is to run a shell (
cmd.exefor windows) and use it’s capabilities instead of directly starting F# Interactive.Ideally we would use it’s arguments that allow to run commands but windows program arguments function differently than unix platforms: They are a single string and programs are free to parse them as they want. As NodeJS started on unix it’s API wants an array of parameters that are then encoded using the MSVCRT rules but
cmd.exeparameter/Chas a very special handling that doesn’t follow theses conventions and we can’t use it.But VSCode allow us to send simulated keystrokes to the terminal so we’ll use this
let private runFile () =
    let scriptFile = window.activeTextEditor.document.fileName
    let terminal = window.createTerminal("script", "cmd.exe", [||])
    terminal.sendText(sprintf "\"%s\" \"%s\" && pause && exit" Environment.fsi scriptFile)
    terminal.show ()
We now have a working minimal sample and can start to build from there:
- We need to change our directory to the one of the script (the default is the root of the workspace) before running it
- The fixed title become confusing pretty fast if we run multiple different scripts
For both we might be tempted to use
System.IO, but that’s not something that’s currently translated:ERROR in ./src/Components/ScriptRunner.fs G:/Code/_ext/ionide-fs/src/Components/ScriptRunner.fs(24,24): (24,67) error FABLE: Cannot find replacement for System.IO.Path::GetDirectoryName @ ./src/fsharp.fs 45:0-71 @ ./src/Ionide.FSharp.fsprojThe solution is to use the NodeJS Path API directly, the whole NodeJS API is provided by Fable in the Fable.Import.Node Nuget package that Ionide already import
open Fable.Import.Node

let private runFile () =
    let scriptFile = window.activeTextEditor.document.fileName
    let scriptDir = Path.dirname(scriptFile)

    let title = Path.basename scriptFile
    let terminal = window.createTerminal(title, "cmd.exe", [| "/K" |])
    terminal.sendText(sprintf "cd \"%s\" && \"%s\" \"%s\" && pause && exit" scriptDir Environment.fsi scriptFile)
    terminal.show ()
Now let’s cleanup, add unix support and we’re ready to send a PR:
namespace Ionide.VSCode.FSharp

open System
open Fable.Import.vscode
open Fable.Import.Node

module ScriptRunner =
    let private runFile (context: ExtensionContext) () =
        let scriptFile = window.activeTextEditor.document.fileName
        let scriptDir = Path.dirname(scriptFile)

        let (shellCmd, shellArgs, textToSend) =
            match Os.``type``() with
            | "Windows_NT" ->
                ("cmd.exe",
                 [| "/Q"; "/K" |],
                 sprintf "cd \"%s\" && cls && \"%s\" \"%s\" && pause && exit" scriptDir Environment.fsi scriptFile)
            | _ ->
                ("sh",
                 [||],
                 sprintf "cd \"%s\" && clear && \"%s\" \"%s\" && echo \"Press enter to close script...\" && read && exit" scriptDir Environment.fsi scriptFile)

        let title = Path.basename scriptFile
        let terminal = window.createTerminal(title, shellCmd, shellArgs)
        terminal.sendText(textToSend)
        terminal.show ()

    let activate (context: ExtensionContext) =
        commands.registerCommand(
            "fsharp.scriptrunner.run",
            runFile |> unbox<Func<obj,obj>>) |> context.subscriptions.Add
Conclusion
VS Code an Ionide are the perfect introduction for any programmer that wants to start customizing his tools so don’t hesitate.
You’re missing an icon ? Some command would make your life easier ? Fork, Build, Contribute !
- In the Integrated terminal (View > Integrated Terminal menu) we run
PreviousNext